 Pin
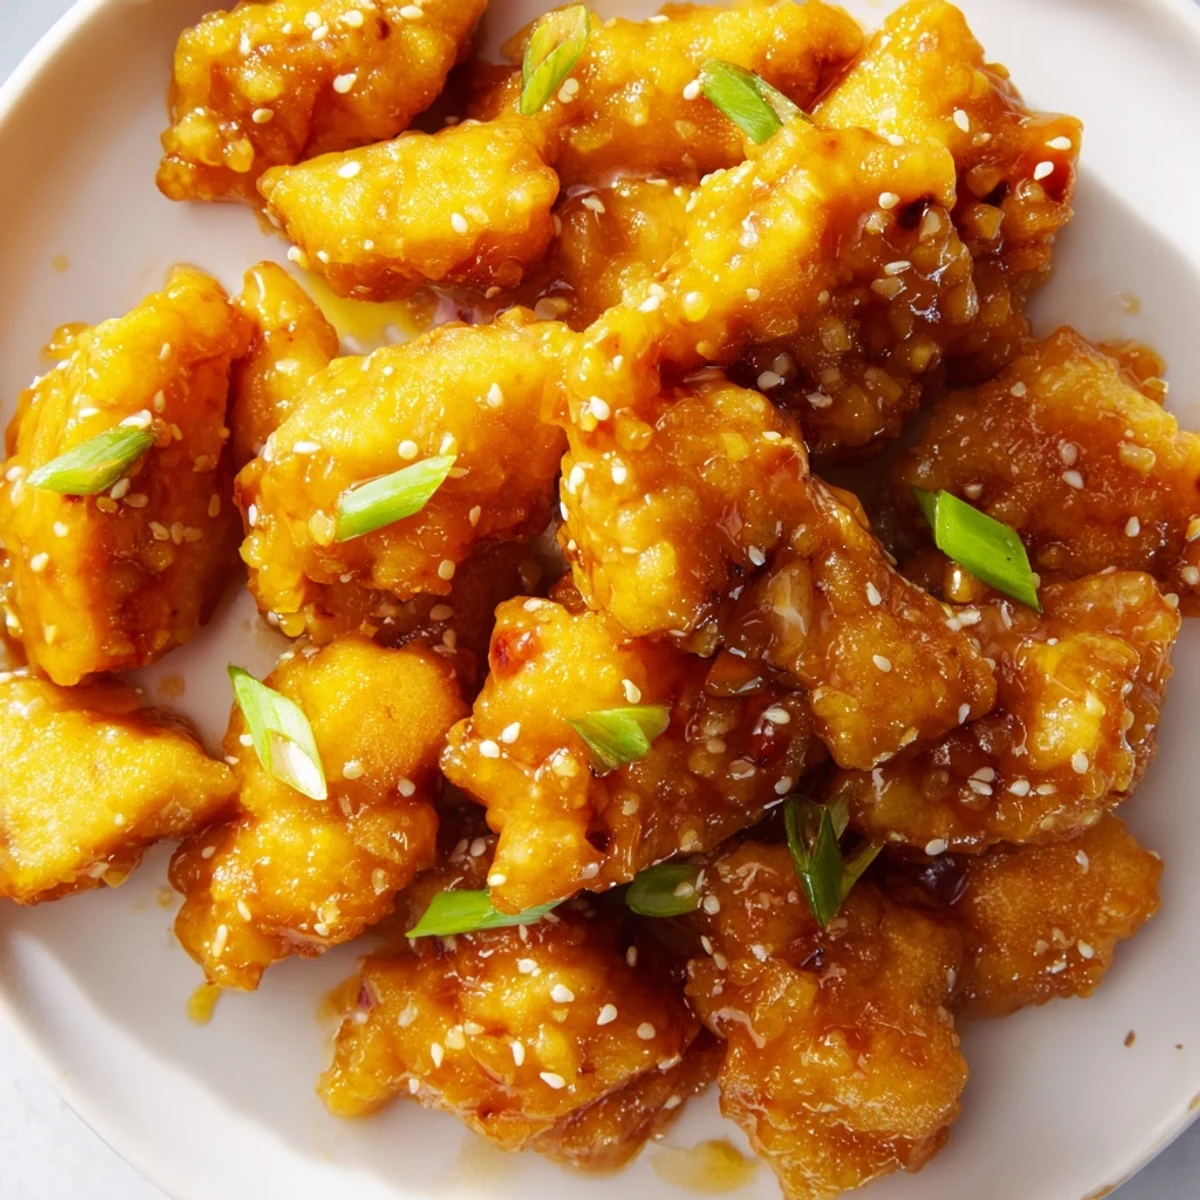
Pin This healthier take on the American-Chinese classic features tender chicken pieces breaded and baked until golden, then tossed in a vibrant orange sauce. The sauce balances fresh citrus juice with savory soy sauce, aromatic garlic and ginger, and just enough sugar for that signature sticky glaze. Baking instead of frying reduces oil while maintaining satisfying crunch, especially when you finish with a quick broil. Perfect over steamed rice with spring onions and sesame seeds for a complete meal that captures restaurant flavor at home.
The smell of oranges and garlic simmering on the stove still takes me back to my first apartment, where I discovered that baking chicken could actually deliver that crave-worthy crunch without the mess of deep frying. My roommate walked in from a late shift and immediately asked what takeout place I'd discovered, looking genuinely confused when I pointed to the baking sheet. That moment of triumph, watching someone's eyes light up at homemade food that tasted like comfort, converted me forever to the oven method.
I once quadrupled this recipe for a potluck, setting up an assembly line on my kitchen counter like a restaurant station. My friend's daughter, who claimed to hate everything except plain noodles, ended up eating three helpings and asking if I could teach her mother the secret. There's something universally satisfying about that tangy-sweet glaze clinging to crispy chicken that makes people pause and really savor each bite.
Ingredients
- 700 g boneless chicken: Thighs stay juicier but breasts work wonderfully, just don't cut them too small or they'll dry out
- 2 large eggs: Room temperature eggs create a better adhesive for the coating, so set them out while you prep everything else
- 180 g cornstarch and flour mixture: This combo creates that lighter-than-air crunch, with cornstarch doing the heavy lifting for crispness
- ½ tsp salt and pepper: Don't skip seasoning the coating, since the sauce only adds flavor to the outside
- 240 ml fresh orange juice: Freshly squeezed makes a noticeable difference, but good quality not-from-concentrate works in a pinch
- 1 tbsp orange zest: This is where the bright orange punch comes from, so zest before you juice and don't be shy with it
- 2 tbsp soy sauce: Adds that savory depth that balances the sweet, though tamari works perfectly for gluten-free needs
- 2 tbsp rice vinegar: The secret ingredient that cuts through the sugar and makes the sauce taste like restaurant quality
- 75 g sugar: Granulated dissolves easily into the sauce, creating that glossy restaurant-style finish
- 2 garlic cloves and 1 tsp ginger: Fresh minced garlic and grated ginger give you those aromatic little flavor bursts in every bite
- 2 spring onions and sesame seeds: The finishing touch that makes it look as good as it tastes
Instructions
- Set up your oven and workspace:
- Preheat that oven to 220°C with confidence, line your baking sheet with parchment for easy cleanup, and clear some counter space for the messy but rewarding coating process.
- Create your dredging station:
- Beat those eggs in one shallow bowl until they're uniform, then whisk together the cornstarch, flour, salt, and pepper in another separate bowl.
- Coat the chicken pieces:
- Dip each piece of chicken into the egg, letting any excess drip off, then press it firmly into the cornstarch mixture until it's thoroughly coated on all sides.
- Bake to golden perfection:
- Arrange the coated chicken on your prepared baking sheet without overcrowding, give it a light drizzle or spray of oil, and bake for 20-25 minutes, flipping halfway through.
- Whisk up the magic sauce:
- While the chicken bakes, combine all the orange sauce ingredients in a saucepan and bring it to a gentle simmer over medium heat, stirring constantly until it thickens beautifully.
- Bring it all together:
- Toss that hot, crispy chicken in your glossy orange sauce until every piece is coated, then sprinkle generously with sliced spring onions and sesame seeds.
 Pin
Pin This recipe became my go-to for dinner guests after I watched my normally picky brother-in-law go back for thirds, sauce covering his chin and a look of pure satisfaction on his face. Food has this magical way of bringing people together, and something about sharing a dish that feels like a treat but comes from your own kitchen creates such a warm connection.
Making It Ahead
You can coat the chicken pieces and arrange them on the baking sheet up to a day ahead, covering tightly with plastic wrap and storing in the refrigerator. The sauce can also be made in advance and stored in the fridge, then gently reheated while the chicken bakes.
Perfect Pairings
Steamed jasmine rice soaks up that extra sauce beautifully, and roasted broccoli or sugar snap peas add a fresh crunch to balance the rich flavors. For a more casual meal, try serving it over cauliflower rice for a lighter twist that still satisfies.
Getting That Restaurant Finish
Broiling the sauced chicken for just 1-2 minutes after tossing creates those caramelized edges that make it look professionally plated. Watch it like a hawk though, since the sugar in the sauce can go from perfect to burnt in seconds.
- Slice the spring onions on a diagonal for that restaurant presentation
- Toast your sesame seeds in a dry pan for 30 seconds before sprinkling
- Serve immediately while the contrast between crispy coating and sticky sauce is at its peak
 Pin
Pin There's something deeply satisfying about recreating restaurant favorites at home, making them exactly how you like them. This orange chicken has become such a staple in my kitchen that I can hardly remember the last time I ordered takeout.
Recipe Questions & Answers
- → Is this baked version as crispy as fried orange chicken?
-
The baked version achieves satisfying crispiness through a cornstarch-flour coating and light oil drizzle. For extra crunch, broil the chicken for 2-3 minutes before tossing in sauce. While not identical to deep-frying, it delivers excellent texture with significantly less oil.
- → Can I make the orange sauce ahead of time?
-
Yes, prepare the sauce up to 2 days in advance and store it refrigerated in an airtight container. Reheat gently on the stove, whisking until smooth. The sauce thickens upon cooling, so add a splash of water or orange juice when reheating to reach desired consistency.
- → What's the best way to get a thick, sticky glaze?
-
Simmer the sauce over medium heat, stirring constantly, until it coats the back of a spoon. The cornstarch in the sauce mixture creates the thickening action. Don't boil vigorously, as this can break down the thickener. The sauce continues to thicken slightly as it cools.
- → Can I use chicken thighs instead of breasts?
-
Chicken thighs work beautifully and often yield juicier results due to their higher fat content. Adjust baking time as needed—thighs may require an extra 3-5 minutes depending on size. Boneless, skinless thighs cut into similar-sized pieces ensure even cooking.
- → How do I make this gluten-free?
-
Replace all-purpose flour with a 1:1 gluten-free flour blend in the dredging mixture. Substitute tamari or coconut aminos for soy sauce in the sauce. Ensure all other ingredients, including any garnish or serving sides, are certified gluten-free.
- → What sides pair well with this dish?
-
Steamed jasmine rice is the classic accompaniment, soaking up the flavorful sauce. Steamed broccoli, bok choy, or snap peas add fresh contrast and color. For a lighter meal, serve over cauliflower rice or with a simple cucumber salad dressed with rice vinegar.
